11 Days of Salesforce Storefront Reference Architecture (SFRA) — Day 5: Using Custom Preferences
Read time: 6 minutesJohnny Tordgeman

Our new magic cartridge is (hopefully) running as expected, however, it’s kinda boring right now. It is preconfigured and our site admins cannot change anything on it without code. This is where Custom Preferences comes in. Custom Preferences enable developers (i.e us) to make properties for modules we develop (i.e cartridges) configurable in the Business Manager!
Creating The Custom Preferences Group
The easiest way to create new Custom Preferences (we will discuss importing existing ones later) is through the Business Manager. Custom Preferences are created on a site (storefront) level and are then grouped under a Custom Preferences group. Accessing a site’s custom preferences is done in the Merchant Tools section of the Business Manager.
We will start by creating a new Custom Preferences group called MagicConfig, which will hold all the custom preferences objects related to the Magic Cartridge we created yesterday:
- Open your Business Manager, select the RefArch site and navigate to Merchant Tools > Site Preferences > Custom Preferences.
- Click on New to create a new Custom Preferences group.
- Type Magic_Config for the new group ID, MagicConfig as the name, and click Add.
- Refresh the Custom Site Preference Groups page and you should see the new MagicConfig group

MagicConfig is now part of the Custom Site Preference Groups
Adding a New Attribute
A custom preference group consists of different attributes that represent an object. SFCC allows an attribute to be part of two types of objects: System and Custom. A system object allows you to add attributes to a site-wide object that is later used in your storefront. Such objects can be Product, Coupon, Invoice, etc. In addition, System objects can also contain attributes for Site Preferences or a Service Profile. For our cartridge, we would like to add a Custom Preference that allows the site admin to set the background color for the cartridge template without needing to edit it directly or redeploy it. Any attribute that describes a Site Preference will be defined for the Site Preferences object.
To add a custom preference attribute to the Site Preferences object:
- Open your Business Manager and navigate to Administration > System Object Types.
- In the System Object Type List look for SitePreferences and click on it.
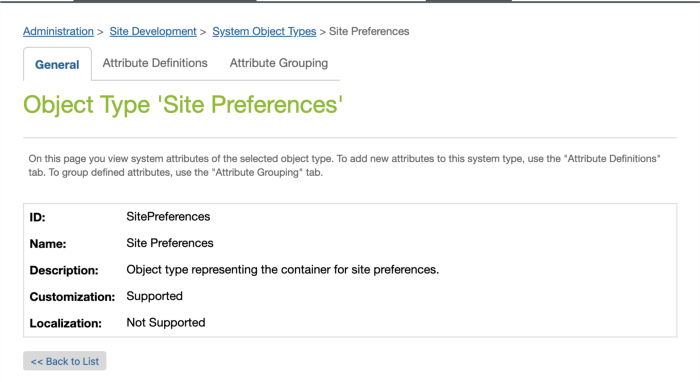
- Here you can see a summary of this object type, including its description, customization support, and more:

If an object does not support customization, we will not be able to add new attributes to it or edit its grouping.
4. Click on the Attribute Definitions tab.
5. The list shown is of all of the attributes currently defined for the Site Preferences object. Click on the New button in the bottom right corner to add a new attribute.
6. Fill in the following and click Apply:
- ID: MagicBackground
- Display Name: Magic Cartridge Background Color
- Help Text: A hexadecimal color value for the Magic cartridge background color.
- Value Type: String
7. You’ll now see the Attribute Definition Details page where you can set additional properties to the new attribute.
Congratulations! You just created your first attribute
Populating MagicConfig
Like T. S. Eliot said “Home is where one starts from,” each of our attributes must be associated with a home. or rather, a Custom Preference group. As such, before we can use our new background color attribute, we need to bind it to a group.
- Open your Business Manager and navigate to Administration > System Object Types.
- In the System Object Type List look for SitePreferences and click on it.
- Click on the Attribute Grouping tab.
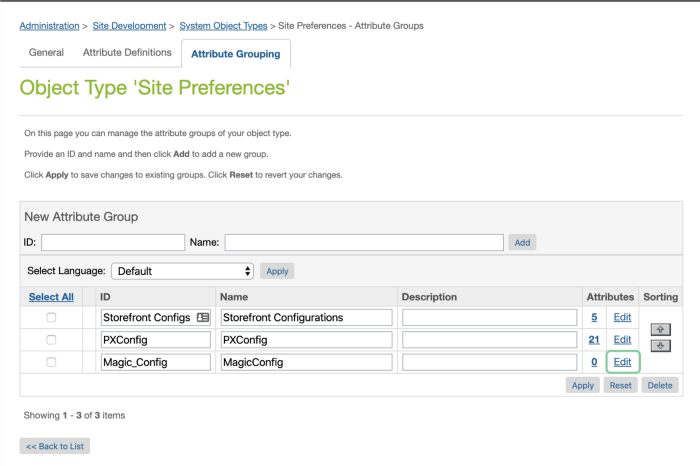
- Here you should see the Magic_Config group we created earlier. Under the Attributes column, click on Edit:

The MagicConfig Edit button is located under the Attributes column on the right side_
5. In the ID text box type MagicBackground and click Add. This will bind the attribute to the group, enabling us to actually use it!
Adding Support for MagicBackground in ISML
We are done setting up our custom attribute in the Business Manager but before we can actually use it we need to add support for it in our Magic Cartridge template.
- Open the
magic.ismltemplate, located at thetemplates/defaultfolder. - Under the style element add the following snippet:
- isprint — an element that allows us to specify a value to display.
- The value of
isprint— As you might have noticed we used a dynamic variable for the value ofisprint:dw.system.Site.current.preferences.custom.MagicBackground.What does this big scary line mean?
– dw.system — namespace of the object where the Site object resides
– Site — an object referencing a storefront.
– current — an object referencing the current site (storefront) the user is on.
– preferences — an object referencing the site’s preferences.
– custom — an object referencing the custom preferences object of the general site preferences.
– MagicBackground — the ID of our custom attribute. - encoding — The encoding type the element will use for its value.
3. Upload the changes to SFCC by runningnpm run uploadCartridge from the root folder of the cartridge.
Go Wild
We are now ready to test our new custom attribute!
- Open your Business Manager, select the RefArch site and navigate to Merchant Tools > Site Preferences > Custom Preferences.
- Click on Magic_Config.__ Here you will meet the custom attribute we created earlier for the background color.**
- Enter a value for the color, for example, #000, and click Save.
- Navigate back to the Magic controller (if you need a refresher on the URL, have a look at Day 4) and watch the magic!


Before and after shots (the default background is white)
And there you have it, a custom preference attribute that allows the storefront admin to change the background color of our custom cartridge without needing to use code or deployment
If you are now thinking “Johnny, that is awesome and all, but I want to call outside sources from my cartridge to get or send data!” then patience, young grasshopper, come back tomorrow to meet the Services Framework.
As always, looking forward to your comments either here or on Twitter